


Editor's Rating
This recipe is inspired by Vito Iacopelli. Please check out his YouTube Channel for more detailed explanations.
It has been a week since I wrote about the quick and easy 4-ingredient thin-crust pizza dough. I had been interested in making pizza since then. In fact, I created an “Italian Day” for the household to enjoy Pizza and Spaghetti Bolognese and be able to put all plans in action. I
mightbe able to make more pizza recipes using a variation of alternative methods. Also, with all these I have started dreaming of having my own pizzeria in the future.This recipe is inspired by Vito Iacopelli. Please check out his YouTube Channel for more detailed explanations.
This could be a very tedious process for most of us, but the end product is all worth it. Let’s all be inspired! Apologies if I haven’t taken a photo of the step-by-step process, unlike the rest of my other recipes. I guess I can’t hold a camera and a pizza dough together on both hands. Ciao!
Biga Starter: Requires 48 hours of Fermentation
Total Preparation Time: 55 hours, including fermentation time
Serves: 6 1/2, 6″ Thick-Crust Pizza
INGREDIENTS (1):
FOR THE BIGA STARTER
- AP Flour – 200 g
- Water (Cold) – 100 g
- Yeast – 0.5 g
PROCEDURE (1):
- Sprinkle the yeast into the water. Water temp should be ideally in between 27-34 C.
- Put the flour in a bowl.
- Pour the water into the flour in stages. Please do not put Flour into the water as it will change the consistency of the dough.
- When mixing the flour and water together, you should just squeeze it in your hands. Do not be tempted to mix or knead the dough.
- Biga starter should look rough.
- Make sure all flour is well hydrated and there should be no dry flour. Again, do not knead the Biga.
- Put it into a container, preferably with a space as the Biga will rise a bit. Your regular tupperware container will work.
- Rest at room temperature for 1h. Later on, rest in the fridge for 48h. A good Biga shouldn’t smell sour but yoghurt-ish and sweet.

INGREDIENTS (2):
FOR THE PIZZA DOUGH
- Biga – 300g (All of the Biga)
- AP Flour – 600g
- Water – 400g*
- Salt – 10g
- Yeast – 0.5g
Chef’s Notes: *I will give more explanations regarding water/hydration. If you notice, here the water content is about 66.67% of the flour (400 g divided by 600 g)
PROCEDURE (2):
- Pour water in your mixer bowl with dough hook attachment ready.
- Break the Biga in small pieces. Put the Biga in the water.
- Mix the Biga in the water. Run the mixer in low speed. Make sure that the Biga is incorporated into the water.
- You can use your hands to squeeze the Biga chunks. You won’t be able to melt all of the Biga as it contains a bit of gluten.
- Once the Biga is incorporated and the color of the water is milk-ish, start putting in the flour in stages. Do not put all flour in. Mix in low-medium speed.
- After all flour is in the mixture, rest the dough a bit for 20-30 mins to relax the gluten.
- After 20-30 mins, mix the dough again until the dough is smooth. Do the dough window test to make sure the gluten is developed.
- Rest the dough for 1 hour. After 1 hour, dust your table with flour a bit and and take out the dough. Massage the dough a bit by pressing your fingers onto the dough. Put a bit of olive oil on top of the dough to prevent the dough from drying out.
- Cover it with a cling wrap or a kitchen towel. Rest the dough for 30 mins.
- After 30 mins., shape the dough into balls. Now, this is very important. When you are shaping your dough balls, make sure the TOP side of your dough is the surface side of the ball. Why? I don’t know, ask Vito.
- To make an 8-inch pizza, weigh your dough to about 340 g. To make a smaller pizza like mine, weigh 200 g.
- If the dough is too sticky, put a bit of flour in your hands, but not too much.
- Put the dough in a container, ideally long rectangle container or you can just rest it on your table / bench, covered in cling wrap / kitchen towel.
- Put a bit of flour on top of the dough to prevent sticking.
- Rest the dough for 2 hours.
- After 2 hours, it’s ready to use. If you are not going to use all of the dough, it can be stored in the fridge for up to 2-3 days. (This can serve as your pre-made pizza dough.)

Chef’s Notes:
On Dough Hydration
What makes pizza dough fluffy and airy and soft is not only Vito Iacopelli’s recipe (Mamamia, Ti Amo Vito. Ciao), but your oven temperature as well.
Pizza needs to be cooked in a really high temperature oven to allow the water content in the dough to evaporate rapidly and, as a result, creating that perfectly fluffy, airy and soft pizza dough that we want. If you notice, pizzeria in Italy only cooks their pizza for about as fast as 90 secs. Imagine how ridiculously hot is the oven?!
The thing is most of us do not have a brick oven. It is very expensive to buy one and it takes a lot of space of your kitchen to have one. Unless, you are the son of a rich Arab oil tycoon, please just go to Italy and buy your own pizza.
So now, the question is how do we tackle this problem? At most, your home oven will only get as hot as 250 C and that’s probably not the actual temperature. I set my oven to 250 C, and the temperature only registers 210-220 C.
The answer is in the dough hydration. In this recipe, the dough hydration is only 66.67%. It is ideal for a pizzeria business who has the proper equipment to cook a proper pizza, but for us, home cooks, it is not. Our pizzeria Godfather, Vito Iacopelli, suggested to increase the dough hydration. What it does is, as our home oven cooks the pizza longer than the brick oven, it allows the dough to not run out of water quickly and overcook the dough. We need more hydration in the dough to compensate our low temperature oven. Okay, sorry guys, I’m just bullshitting you with the baking science. But I swear, that’s what Vito suggested. So, please increase the water to 480 g which is going to bring the hydration to 80% level.
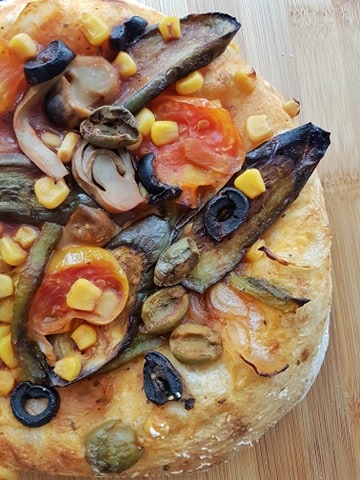
Toppings
For every pizza I make, I have a couple of topping staples. This includes, of course the pizza sauce, and…

Tuna, Corn, Bacon, Mushrooms, Garlic, Olives, Tomatoes, Onions, Cheese, Herbs and Spices
Be creative and imaginative with this. You can create your own pizza staples, or you can copy what’s on my pizza.

I even made a dessert pizza out of this recipe. Behold: Banana Nutella Pizza with Dark Chocolate.
